Showing posts with label tutorial. Show all posts

Sunday, 19 February 2012

Post-it note cover - tutorial

This is a super quick make which costs hardly anything! 
All you need is a block of sticky post-it notes, some card, patterned paper and glue.
Start by cutting a piece of card so that it is the same width as your sticky notes, and long enough to wrap around; ie height + height + thickness of the pad.
Make two firm creases where the card will bend around the pad, then glue the sticky pad onto the bottom of the rectangle of card.
Then you will need whatever you want to decorate it with. I'm using a square of patterned paper, a heart shape and some letters. You can be as creative as you like - space permitting!!
Stick the square of patterned paper on the front.
Then stick on the rest of your embellishments - easy peasy!!

If you make one let me know! I'd love to see :)


Sunday, 6 November 2011

How to make a bag out of a pillowcase


This is one of my favourite upcycling projects. I'm sure there are lots of tutorials on t'internet about how to make a bag from a pillowcase. I'm not saying this is the best way, but this is the way I do it!
First you need a pillowcase; they are really easy to pick up in charity shops and I love the chintzy floral prints.
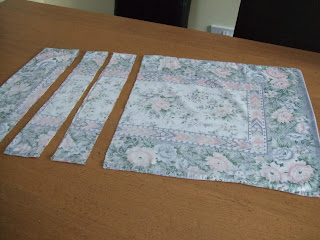
Then you need to chop it into pieces. 
The bottom piece is the main part of your bag - I measured this to be 18 inches deep.
The two smaller pieces will be the handles; mine are 3 inches deep.
(The top part is leftover; ideal scrap for applique and patchwork projects.)
Take your two handles and turn the ends under and pin.
I top stitch these together, rather than sewing it inside out then struggling to turn them back again.
Here they are all stitched, ready to attach onto the bag part.

Turn the bag part inside out (hopefully you've realised by this point that the beauty of using a pillow case is that it is almost a bag anyway!!) and turn over and iron the top edge down, slipping your handles under in the right place.
Stitch all around near the raw edge. (I cut mine with pinking shears to avoid fraying but you might need to do a double hem here.)
Then turn your bag the right way out and topstitch all around the top, making sure you go over the handles. This will give them extra strength and stop the top of your bag flopping over.
Ta-dah!
(And it folds up all teeny tiny so it's fab for popping in your handbag when out shopping.)


Saturday, 5 March 2011

How to make a wet wipes cover

 I've been making these wet wipe covers out of oilcloth, and I thought I'd share with you.
 You need a rectangle of oilcloth 26cm by 40cm. 
(I think some sturdy canvas type material might work too, normal cotton would be too floppy.)
 Turn over the 2 shorter edges to make a hem each end of approximately 1 cm.
The oilcloth won't slip through the machine so you need to pin a layer of tissue paper over where you need to sew.
 Sew the hems and rip the tissue off.
 Next wrap your rectangle around a full pack of wipes. 
There should be an overlap of about 2 cm. Pin each side.
 Take the wipes out and pin the sides in place, making the opening central.
(Your cover should be inside out.)
Sew the sides up and tidy the loose threads.
Turn the right way out and it's done!

(Edited to add; if you cut a rectangle 20cm x 16cm, follow the same method and you will make a little pouch the right size for a pack of disposable tissues.)